Your brakes are the most critical safety feature on your vehicle. You can have the best engine in the world, but if your car cannot stop safely, nothing else matters. Over time, the friction material on your brakes naturally wears down. This means every driver will eventually face the need for a VW Golf brake pads replacement. Many owners feel intimidated by brake maintenance. They assume they must visit the dealership and pay premium prices. However, replacing your brake pads is actually a very straightforward and manageable task. Whether you choose to hire a mechanic or tackle the job in your driveway, understanding the process saves you money and keeps you safe on the road. This comprehensive guide will teach you exactly how to identify worn brakes, how much you should expect to pay, and how to perform the replacement yourself. Keeping your braking system in top condition is a crucial part of your overall VW Golf Maintenance & Service routine.
Top Signs You Need a VW Golf Brake Pads Replacement
Your car rarely experiences a sudden brake failure without warning. Volkswagen engineers designed the braking system to give you multiple alerts before the situation becomes dangerous. You just need to know what to look, listen, and feel for.
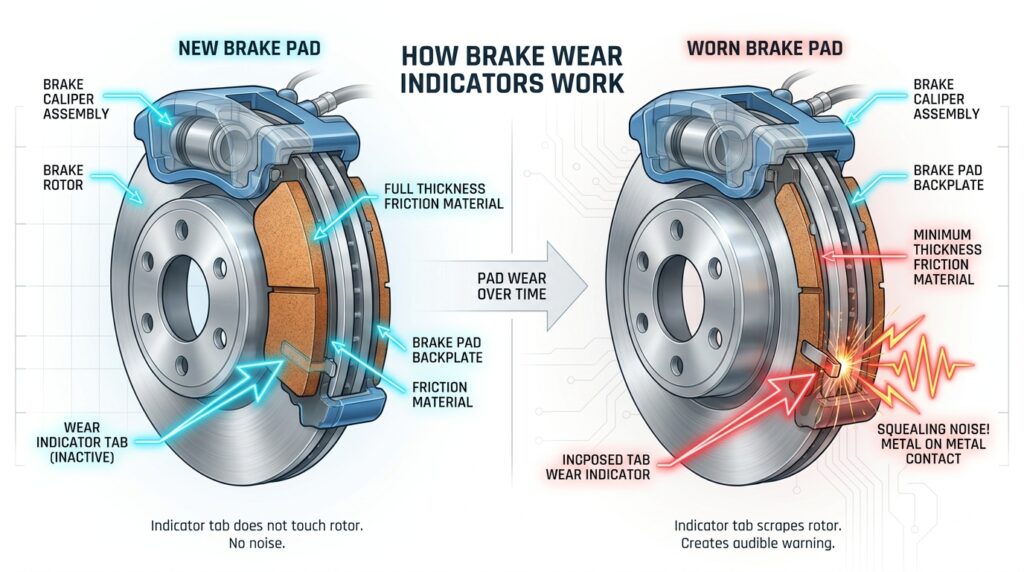
- Squealing or Chirping Noises: Brake pad manufacturers build small metal wear indicators into the pads. When the friction material gets low, this metal tab rubs against the brake rotor. This creates a high-pitched squeal. If you hear this sound while driving, you need to inspect your brakes immediately.
- Harsh Grinding Sounds: A grinding noise is bad news. This sound means you have completely worn through the brake pad material. Now, the metal backing plate is grinding directly against your metal brake rotor. This damages the rotor and significantly reduces your stopping power. You must stop driving and replace the brakes right away.
- A Spongy Brake Pedal: When you press the brake pedal, it should feel firm and responsive. If the pedal feels soft, spongy, or sinks all the way to the floor, you have a serious problem. This often points to worn pads, but it can also indicate low brake fluid or air in the brake lines.
- Steering Wheel Vibrations: If your steering wheel shakes violently when you press the brakes, your brake rotors are likely warped. This usually happens when the pads wear unevenly and generate excessive heat.
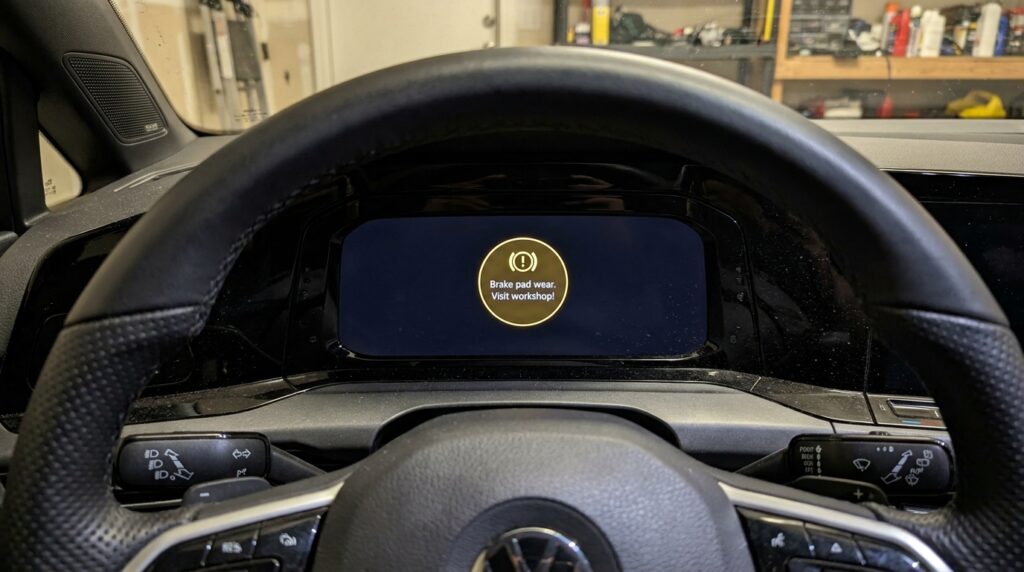
- Dashboard Warning Lights: Modern VW Golf models feature electronic brake pad wear sensors. When the pad becomes dangerously thin, the sensor triggers a specific yellow or red brake warning icon on your dashboard.
Important Diagnostic Note: If you see multiple warning lights on your dash, it’s important to diagnose them properly; while brake wear has its own icon, unexpected power loss might trigger the VW Golf EPC light.
How Long Do VW Golf Brake Pads Last?
Drivers constantly ask how long their original brake pads will survive. There is no single magic number. The lifespan of your brake pads depends heavily on your driving environment, your personal driving habits, and the type of transmission you have. On average, VW Golf front brake pads last between 30,000 and 60,000 miles. Rear brake pads generally last longer, often reaching 50,000 to 70,000 miles. Why the difference? When you press the brake pedal, the weight of your car shifts forward. Your front brakes handle about 70% of the stopping force, so they wear out much faster.
Factors That Affect Brake Life
- City vs. Highway Driving: Stop-and-go city traffic requires constant braking. This burns through pads quickly. Highway drivers who coast for long distances will see their brake pads last much longer.
- Driving Style: Aggressive drivers who brake late and hard will destroy their brake pads prematurely. Smooth, anticipatory braking extends component life.
- Vehicle Weight: If you constantly carry heavy cargo or full carloads of passengers, your brakes must work harder to stop the vehicle.
To maximize the lifespan of your vehicle, you should inspect your brakes according to the official VW Golf service intervals & schedule.
VW Golf Brake Pads Replacement Cost: DIY vs. Mechanic
Cost is usually the biggest concern for VW owners. You basically have three choices: take the car to the local VW dealership, visit an independent local mechanic, or do the job yourself in your garage. The cost varies widely based on which route you choose. Dealerships charge premium labor rates and use strictly Original Equipment Manufacturer (OEM) parts. Independent shops offer lower labor rates. Doing it yourself eliminates labor costs entirely.
Estimated Cost Comparison Table (Per Axle)
| Service Option | Parts Cost (Estimated) | Labor Cost (Estimated) | Total Cost (Estimated) |
|---|---|---|---|
| VW Dealership | $100 – $150 (OEM) | $150 – $250 | $250 – $400 |
| Independent Mechanic | $60 – $120 | $100 – $150 | $160 – $270 |
| DIY (Do It Yourself) | $40 – $100 | $0 | $40 – $100 |
Note: Prices above reflect standard brake pad replacement per axle (front or rear). If your brake rotors also require replacement, expect to add $100 to $200 more to the final bill.
Choosing the Right Brake Pad Material
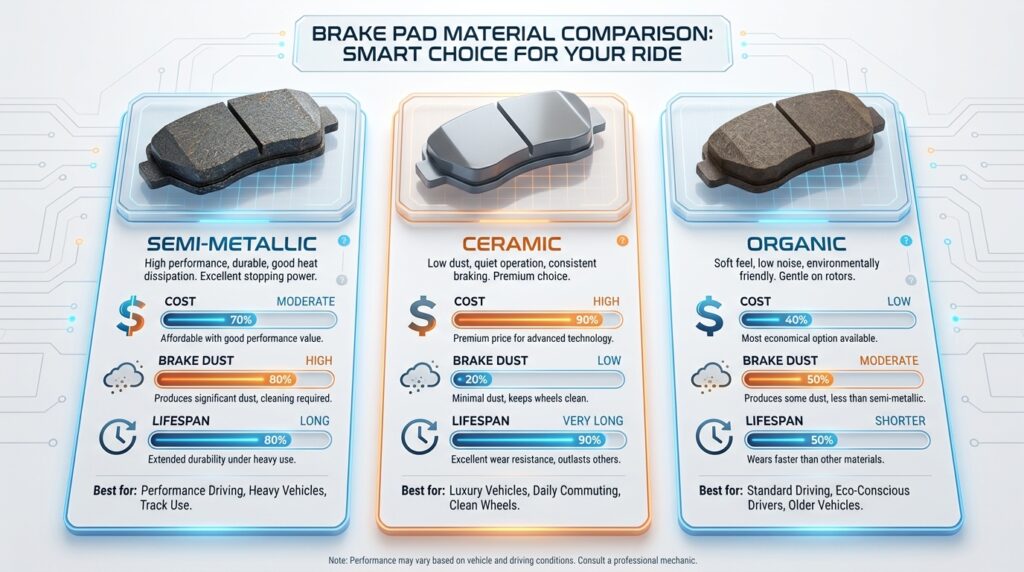
If you decide to buy your own parts, you will notice different materials available. You can learn more about general brake safety standards at the National Highway Traffic Safety Administration (NHTSA), but here is a quick breakdown of your material choices:
- Semi-Metallic: These are very common on European cars like the VW Golf. They offer excellent stopping power and handle heat well. However, they create a lot of black brake dust on your wheels and can be slightly noisy.
- Ceramic: Ceramic pads are a fantastic aftermarket upgrade. They produce almost zero visible brake dust, keeping your wheels clean. They run very quietly and last a long time. They usually cost slightly more than semi-metallic pads.
- Organic: These are the cheapest option. They are soft and quiet but wear out very quickly. We generally do not recommend organic pads for a spirited car like the VW Golf.
Step-by-Step DIY Guide: Replacing Front and Rear Brakes
Replacing your own brake pads is highly rewarding. It saves you hundreds of dollars and teaches you valuable mechanical skills. The front brakes are purely mechanical and very easy to change. The rear brakes on modern Golfs (MK7 and MK8 generations) require a special electronic step.
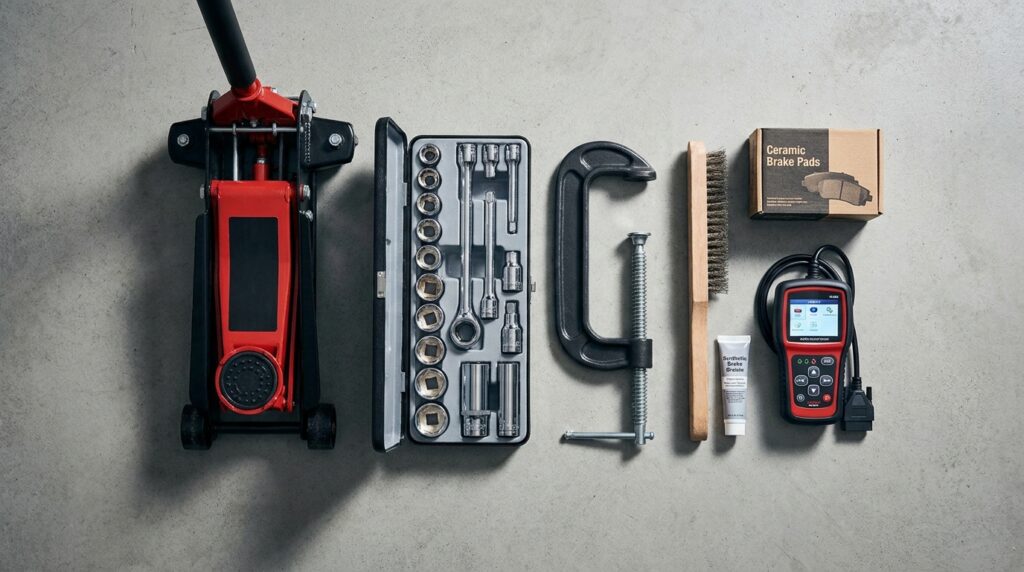
Tools You Will Need
- Floor jack and sturdy jack stands
- Lug wrench or breaker bar
- Basic socket set and wrenches (often requires a 7mm Allen/Hex socket)
- Large C-clamp or a dedicated brake caliper piston compressor tool
- Wire brush and brake cleaner spray
- High-temperature brake grease (synthetic caliper grease)
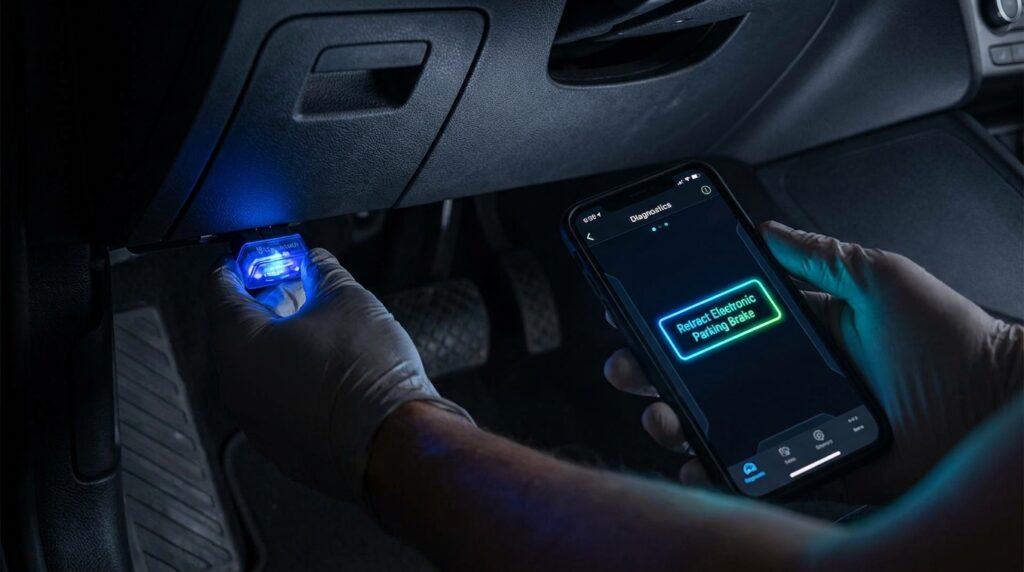
- For Rear Brakes Only: An OBD2 scanner tool with Electronic Parking Brake (EPB) retraction capabilities (like VCDS, OBDeleven, or Carista).
Step 1: Preparation & Lifting the Car
Park your VW Golf on a flat, level concrete surface. Never work on dirt or gravel. Chock the wheels that will remain on the ground to prevent the car from rolling. Loosen the lug bolts on the wheels you plan to remove just half a turn before lifting the car. Use your floor jack to lift the car at the factory-designated pinch weld points. Once the car is high enough, place your jack stands securely underneath. Slowly lower the car onto the stands. Never work under a car supported only by a hydraulic jack.
Step 2: Removing the Wheel & Caliper
Remove the loosened lug bolts completely and take off the wheel. Turn the steering wheel to point the brake caliper outward. This gives you much better access to the bolts. Locate the two slider pin bolts on the back of the brake caliper. You usually need a 7mm Allen socket to remove these. Once you remove the two bolts, grab the caliper firmly and pull it away from the rotor. Use a bungee cord or zip tie to hang the heavy caliper from the coil spring. Never let the caliper hang by its rubber brake hose, as this will tear the line and cause a dangerous fluid leak.
Step 3: Compressing the Piston
As your old brake pads wore down, the metal caliper piston pushed further outward to close the gap. Because your new brake pads are thick and brand new, you must push that piston back into the housing so the caliper can fit over the new pads. For Front Brakes: Take one of your old brake pads and place it against the piston. Use your large C-clamp or caliper tool to slowly squeeze the piston back into the caliper until it sits flush. Do this slowly so you don’t push brake fluid out of the reservoir under the hood. For Rear Brakes (Electronic Parking Brake): Modern Golfs feature a motorized parking brake on the rear calipers. You cannot mechanically force this piston back. You must plug your OBD2 tool (VCDS or OBDeleven) into the port under your steering wheel. Use the software menu to select “Open Rear Parking Brake for Pad Replacement.” You will hear the electric motors wind back. Once the motors retract, you can then gently push the piston in.
Important: When using an OBD2 diagnostic tool to retract the rear electronic parking brake, ensure your car has adequate voltage, or you may need a VW Golf battery replacement before starting the job.
Step 4: Installing New Pads & Reassembly
Remove the old brake pads from the mounting bracket. Use your wire brush and brake cleaner spray to scrub the metal bracket clean. Remove all old dust, rust, and grime. Apply a thin layer of high-temperature brake grease to the areas where the new brake pads slide on the bracket. Do not get any grease on the friction material or the brake rotor face. If you do, clean it off immediately with brake cleaner. Insert the new brake pads into the bracket. If your car has a wear sensor wire, plug the new sensor into the vehicle’s harness. Slide the brake caliper back over the new pads. Clean your slider pin bolts, apply fresh grease to them, and tighten them down to the factory torque specifications.
Step 5: Putting the Wheel Back On
Place the wheel back onto the hub. Thread the lug bolts in by hand to avoid cross-threading. Tighten them snugly with your wrench. Lower the car off the jack stands. Finally, use a torque wrench to tighten the lug bolts in a star pattern to the exact specification listed in your owner’s manual (usually around 88 lb-ft or 120 Nm).
Safety Check: Once the wheels are bolted back on, double-check your VW Golf tire pressure to ensure optimal handling and safety on your test drive.
Bundling Your VW Golf Maintenance
Time is valuable. When you decide to tackle a DIY brake job, you already have your tools out, your hands dirty, and your car safely elevated on jack stands. This creates the perfect opportunity to knock out other routine maintenance tasks simultaneously. By bundling your maintenance, you save yourself the hassle of setting up your workspace twice. You also ensure your car receives comprehensive care. Since you already have your car lifted and your tools out, it is highly recommended to perform a VW Golf oil change at the same time. You can simply slide your drain pan under the engine, remove the oil drain plug, and let the old oil empty out while you are working on swapping the brake pads in the wheel wells. By the time you finish the brakes, your oil pan is fully drained and ready for fresh synthetic oil.
Post-Installation: Resetting Dashboard Lights & Bedding-In
You cannot simply finish the installation and drive off aggressively. There are two crucial final steps you must perform before your car is safe for normal daily driving.
1. Pumping the Brake Pedal
Before you even turn the key in the ignition, sit in the driver’s seat and press the brake pedal. It will feel very soft and go straight to the floor. Do not panic. This is completely normal. Pump the brake pedal firmly 5 to 10 times until it becomes stiff and solid. This action pushes the brake fluid back into the calipers and seats the pads against the rotors.
2. Clearing Maintenance Codes
If your old brakes triggered a warning light on your dashboard, replacing the physical wear sensor will usually turn the light off. However, sometimes the car’s computer needs a manual reset. Furthermore, if you used an OBD2 tool to retract your rear electronic parking brake, you must use that same tool to “Close” the parking brake so the motors re-engage. Once your new brakes are installed, you may also need to clear your dash notifications. Learn how to quickly reset the service light on a VW Golf.
3. Bedding In the New Brakes
New brake pads require a “bedding-in” process. Bedding transfers an even layer of friction material from the pad onto the metal rotor. This ensures smooth braking and prevents loud squealing. To bed your brakes, drive to a safe, empty road. Accelerate to roughly 40 mph, then brake moderately hard down to 10 mph. Do not come to a complete stop. Repeat this process about 5 or 6 times in a row. You will smell a burning odor; this is the resin curing in the new pads and is completely normal. Drive normally for a few miles to let the brakes cool down. Your brake job is now officially complete.
Frequently Asked Questions (FAQs)
How much does a VW Golf brake pad replacement cost?
If you take your car to a VW dealership, expect to pay between $250 and $400 per axle. Independent mechanics usually charge between $160 and $270. If you buy the parts yourself and do the labor at home, you will only spend between $40 and $100 for high-quality pads.
Should I replace the brake rotors at the same time as the pads?
Not always, but you must inspect them carefully. Brake rotors have a “minimum thickness” specification stamped on the metal hub. Use a micrometer to measure the rotor. If it is thinner than the minimum spec, you must replace it. Additionally, if the rotor has deep grooves, a large rust lip on the edge, or feels warped while driving, you should replace the rotors alongside the pads for optimal safety.
Can I change VW Golf rear brake pads without an OBD2/VCDS tool?
We strongly advise against it. Some people online suggest a “hack” where you disconnect the battery, unbolt the electronic parking brake motor from the caliper, and manually wind the gear back with a Torx bit. While this is physically possible, it carries a very high risk of stripping the delicate plastic gears inside the expensive electronic motor. A basic OBD2 app like Carista or OBDeleven costs very little and safely retracts the motors through the car’s computer. It is worth the small investment to avoid breaking a costly part.
What are the signs my VW Golf needs new brake pads?
The most common signs include a high-pitched squealing noise when braking, a harsh metal-on-metal grinding sound, a soft or spongy brake pedal, steering wheel vibrations, or a yellow brake wear warning light illuminating on your instrument cluster.
“Regularly inspecting your brake pads every 10,000 miles during tire rotations is the smartest way to catch wear early and avoid expensive damage to your brake rotors.”
Conclusion
A VW Golf brake pads replacement is a normal part of vehicle ownership. By understanding the warning signs like squealing noises or dashboard lights, you can address the issue before it compromises your safety or damages your expensive brake rotors. While paying a professional mechanic is always a valid choice, taking the DIY route is an incredibly rewarding experience. It drastically reduces your maintenance costs and gives you a deep sense of pride in maintaining your own vehicle. Just remember to gather the right tools, follow safety protocols, and use an OBD2 tool for the rear electronic parking brakes. Your journey into automotive DIY doesn’t have to stop at the brakes. Taking control of your car’s health is easier than you think. We encourage you to explore the rest of our website for more expert Volkswagen repair tutorials, diagnostic guides, and maintenance tips to keep your Golf running perfectly for years to come.